How-To Guides

Beranda How-To Guides

Effortlessly Recover 3 Crucial Lost Files From Any Device

0

Effortlessly Recover 3 Crucial Lost Files from Any Device

Introduction

In this auspicious occasion, we are delighted to delve into the intriguing topic related to Effortlessly Recover 3 Crucial Lost Files from Any Device. Let’s weave interesting information and offer fresh perspectives to the readers.

Effortlessly Recover 3 Crucial Lost Files from Any Device

Effortlessly Recover 3 Crucial Lost Files from Any Device

Losing important files is a devastating experience, leaving you feeling helpless and frustrated. Whether it’s a cherished photo album, a crucial work document, or a treasured video, the sudden disappearance of digital data can be incredibly stressful. Fortunately, recovering lost files is often possible, regardless of the device or the cause of the loss. This comprehensive guide will equip you with the knowledge and tools to successfully retrieve your precious data, minimizing the impact of accidental deletion, hardware failure, or software glitches. We’ll explore various methods, offering step-by-step instructions and practical advice applicable to computers, smartphones, and other digital devices.

Understanding Data Loss: The Common Culprits

Before diving into recovery methods, it’s essential to understand why files get lost in the first place. This knowledge will help you prevent future data loss and choose the most effective recovery strategy. The most common causes include:

  • Accidental Deletion: This is perhaps the most frequent reason for file loss. A simple slip of the finger while deleting unwanted files can inadvertently remove important data. The "Recycle Bin" (or Trash) on Windows and macOS offers a temporary holding place, but emptying it permanently removes the files.

  • Hardware Failure: A malfunctioning hard drive, SSD, memory card, or other storage device can render your files inaccessible. Physical damage, wear and tear, or unexpected power surges can lead to data corruption or complete drive failure.

  • Software Glitches: Bugs, viruses, or system crashes can corrupt files or the file system, making your data unrecoverable. Improperly shutting down your computer or interrupting a crucial file operation can also lead to data loss.

  • Effortlessly Recover 3 Crucial Lost Files from Any Device

    Formatting: Formatting a storage device erases all data on it, making it seemingly empty. While the data is technically gone from the file system’s perspective, it can often still be recovered.

  • Virus or Malware Attacks: Malicious software can encrypt, delete, or corrupt files, making them inaccessible. This requires immediate action and potentially professional assistance.

Recovery Methods: A Step-by-Step Guide

The best approach to recovering lost files depends on the type of device, the cause of the loss, and the type of files involved. Here’s a breakdown of effective methods:

1. Checking the Recycle Bin/Trash:

This is the first and easiest step. On Windows, check the Recycle Bin. On macOS, check the Trash. If the deleted file is still there, simply restore it by right-clicking and selecting "Restore."

2. Using File History/Time Machine (for Windows and macOS):

  • Effortlessly Recover 3 Crucial Lost Files from Any Device

    Windows File History: If you have File History enabled, it creates backups of your files. You can restore previous versions of files or even entire folders. Open File History, select the desired file, and choose the version you want to restore.

  • macOS Time Machine: Similar to File History, Time Machine creates backups automatically. Connect your backup drive, open Time Machine, and browse through your backups to locate and restore your lost files.

3. Employing Data Recovery Software:

Data recovery software is your best bet if the file isn’t in the Recycle Bin/Trash or your backup system. These programs scan your storage devices, looking for deleted or corrupted files. Many options are available, both free and paid. Some popular choices include:

  • Recuva (Windows): A free and user-friendly option with a simple interface.
  • Disk Drill (Windows and macOS): Offers both free and paid versions with powerful recovery capabilities.
  • PhotoRec (Windows, macOS, Linux): A command-line tool specializing in recovering photos and other multimedia files.
  • TestDisk (Windows, macOS, Linux): A powerful command-line tool for repairing damaged partitions and recovering lost files.

How to Use Data Recovery Software (General Steps):

  1. Download and Install: Download and install the chosen software on your computer.
  2. Select the Drive: Specify the drive or partition where the lost files were located.
  3. Scan: Initiate a scan. This may take some time, depending on the size of the drive.
  4. Preview: Preview the recovered files to ensure they are intact.
  5. Recover: Select the files you want to recover and choose a destination folder. Crucially, do not save the recovered files back to the original drive. This could overwrite the data and make recovery impossible.

4. Recovering Files from External Storage Devices (USB Drives, Memory Cards):

The process is similar to recovering files from internal drives. Use data recovery software, following the steps outlined above. If the device is not recognized by your computer, try connecting it to another computer or using a different USB port.

5. Recovering Files from Smartphones and Tablets:

Recovering files from mobile devices can be more challenging, as the file system and data storage are different. Some methods include:

  • Using Cloud Backups: If you use cloud storage services like Google Drive, iCloud, or Dropbox, check for backups of your lost files.
  • Using Mobile Data Recovery Software: Several apps are available for Android and iOS that can recover deleted files. Research carefully before choosing one, ensuring it’s reputable and safe.
  • Connecting to a Computer: Connect your smartphone or tablet to a computer and use data recovery software designed for mobile devices.

6. Professional Data Recovery Services:

If you’ve tried all the above methods without success, or if the data loss is complex (e.g., severe hard drive damage), consider contacting a professional data recovery service. These services have specialized tools and expertise to handle intricate data recovery cases, but they can be expensive.

Preventing Future Data Loss:

Prevention is always better than cure. Here are some crucial steps to minimize the risk of future file loss:

  • Regular Backups: Implement a regular backup schedule using cloud storage, external hard drives, or other backup solutions. Back up your important files frequently.
  • Use a Reliable Antivirus Program: Keep your computer protected with a reputable antivirus program to prevent malware infections.
  • Avoid Sudden Shutdowns: Avoid forcefully shutting down your computer or interrupting file operations.
  • Keep Your Software Updated: Update your operating system and applications regularly to patch security vulnerabilities and bugs.
  • Handle Storage Devices Carefully: Avoid dropping or physically damaging storage devices.
  • Create Multiple Copies: Keep multiple copies of your important files in different locations.

Conclusion:

Losing files is undoubtedly distressing, but with the right knowledge and tools, recovery is often achievable. By understanding the common causes of data loss and following the steps outlined in this guide, you can significantly increase your chances of retrieving your precious data. Remember to act quickly, as the longer you wait, the lower the probability of successful recovery. Prioritizing regular backups and practicing safe computing habits will further minimize the risk of experiencing this frustrating situation in the future. Don’t hesitate to seek professional help if you encounter complex data loss scenarios. With a proactive approach and the right techniques, you can safeguard your valuable digital assets and maintain peace of mind.

Closure

Thus, we hope this article has provided valuable insights into Effortlessly Recover 3 Crucial Lost Files from Any Device. We hope you find this article informative and beneficial. See you in our next article!
google.com

Amazing Battery Life! 7 Power Tips For Smartphone Optimization

0

Amazing Battery Life! 7 Power Tips for Smartphone Optimization

Introduction

With great pleasure, we will explore the intriguing topic related to Amazing Battery Life! 7 Power Tips for Smartphone Optimization. Let’s weave interesting information and offer fresh perspectives to the readers.

Amazing Battery Life! 7 Power Tips for Smartphone Optimization

Amazing Battery Life! 7 Power Tips for  Smartphone Optimization

Smartphone battery life. A constant source of anxiety for many. That dreaded low-battery warning, appearing just as you need your phone most, is a universally understood frustration. But fear not, fellow phone users! While you can’t entirely escape the limitations of battery technology, you can significantly extend the lifespan of your charge with a few simple tweaks and changes to your usage habits. This article outlines seven powerful strategies to dramatically improve your smartphone’s battery performance, transforming your relationship with your device from one of constant anxiety to one of confident, extended use.

1. Mastering the Brightness Settings: A Simple Yet Powerful Change

One of the biggest battery drains on your smartphone is screen brightness. A brightly lit screen consumes a significant amount of power. While it’s tempting to crank up the brightness in bright sunlight, consider these alternatives:

  • Automatic Brightness: Most smartphones offer an automatic brightness setting that adjusts the screen illumination based on ambient light. This is a highly effective way to conserve battery power without sacrificing visibility. Experiment with the sensitivity of the automatic adjustment to find the optimal balance between readability and energy efficiency. You might be surprised at how well it works, even in diverse lighting conditions.

  • Reduce Brightness Manually: If automatic brightness isn’t quite right for you, simply reduce the brightness manually to a comfortable level. Even a small reduction can make a noticeable difference in battery life over time. Try lowering the brightness gradually until you find the sweet spot where you can still comfortably see the screen without straining your eyes.

  • Dark Mode: The Unsung Hero of Battery Life

Amazing Battery Life! 7 Power Tips for  Smartphone Optimization

Dark mode, or dark theme, is a feature increasingly prevalent in smartphone operating systems and apps. By inverting the color scheme, dark mode reduces the amount of light emitted by the screen, leading to significant power savings. Activating dark mode, especially during nighttime use, can noticeably improve your battery life. Many users report a substantial increase in battery longevity after switching to dark mode, making it a simple yet profoundly effective optimization technique.

2. Location Services: Precision vs. Power Consumption

Location services are incredibly useful for navigation, weather apps, and many other functionalities. However, constantly running location services in the background is a major battery drain.

  • Restrict Background Location Access: Many apps request access to your location even when you’re not actively using them. Review your app permissions and disable background location access for apps that don’t require it. For instance, you likely don’t need your weather app constantly tracking your location.

  • Use High-Accuracy Location Only When Necessary: Your phone offers different location accuracy settings. "High accuracy" uses GPS, Wi-Fi, and cellular data for precise location, consuming more power. Opt for "Battery saving" or "Device only" modes when precise location isn’t crucial. For example, while navigating, high accuracy is essential, but for checking local weather, a less precise method suffices.

  • Turn Off Location Services Completely When Not Needed: If you’re not using any location-based services, simply turn off location services entirely. This is a drastic but highly effective way to conserve battery power. Remember to turn it back on when needed.

  • Amazing Battery Life! 7 Power Tips for  Smartphone Optimization

3. App Management: Cull the Unnecessary and Optimize the Essential

The apps you have installed and how they run significantly impact your battery life.

  • Uninstall Unused Apps: Many people have apps installed on their phones that they never use. These apps still consume resources and can drain your battery, even in the background. Regularly review your installed apps and uninstall any that you no longer need or use.

  • Close Background Apps: Background apps consume resources and battery power even when you’re not actively using them. Regularly close background apps to free up resources and improve battery life. This is particularly important for resource-intensive apps like games or video editors.

  • Limit App Permissions: Review the permissions each app has requested and revoke any that seem unnecessary. For example, does a flashlight app really need access to your contacts? Limiting unnecessary permissions can reduce the amount of resources an app can access, thus improving battery life.

4. Network Connectivity: Balancing Convenience and Power

Your phone’s connection to cellular and Wi-Fi networks significantly impacts battery consumption.

  • Wi-Fi Optimization: Prefer Wi-Fi over cellular data whenever possible. Wi-Fi connections generally consume less power than cellular data. Ensure your Wi-Fi is turned on when you’re in range of a network.

  • Cellular Data Management: Turn off cellular data when you don’t need it. This is particularly useful when you’re in an area with weak cellular signal or when you’re not actively using data-intensive apps. Your phone will consume less power searching for a signal.

  • Airplane Mode for Extreme Battery Saving: When you absolutely need to maximize battery life and don’t require any connectivity, enable airplane mode. This disables all wireless communication, significantly extending your battery’s lifespan.

5. Reduce Notifications and Vibrations: A Quieter, More Efficient Phone

Constant notifications and vibrations consume battery power. Managing these can significantly extend battery life.

  • Limit Notifications: Disable unnecessary notifications from apps. Many apps send frequent notifications that are not essential. Review your notification settings and disable notifications for apps that don’t require immediate attention.

  • Reduce Vibration Intensity: Vibrations consume a surprising amount of battery power. Reduce the intensity of vibrations or disable them altogether. You can rely on audible notifications instead.

  • Turn Off Haptic Feedback: Haptic feedback, the subtle vibrations you feel when interacting with your phone’s interface, also consumes power. Consider disabling haptic feedback to conserve battery.

6. Screen Timeout: Find the Optimal Balance

The length of time your screen remains active before automatically turning off significantly affects battery life.

  • Shorten Screen Timeout: Reduce the screen timeout setting to a shorter duration. This will automatically turn off your screen after a shorter period of inactivity, conserving battery power. Experiment to find a balance between convenience and battery life. A shorter timeout (e.g., 30 seconds or 1 minute) will significantly improve battery life compared to longer durations (e.g., 5 minutes or more).

7. Software Updates and Battery Calibration:

Keeping your phone’s software updated and occasionally calibrating the battery can also help optimize its performance.

  • Install Software Updates: Regularly install software updates. These updates often include battery optimization improvements and bug fixes that can extend your battery life.

  • Battery Calibration (If Necessary): Over time, your phone’s battery gauge might become inaccurate. A battery calibration can help improve the accuracy of the battery percentage indicator. The specific steps for calibration vary depending on your phone’s operating system and model, so consult your phone’s manual or online resources for instructions. Note that this is not always necessary, but can be helpful in some cases.

By diligently implementing these seven powerful strategies, you can significantly extend your smartphone’s battery life, transforming your daily usage experience from one of constant charging anxiety to one of confident, extended use. Remember, consistency is key. Adopting these habits will lead to a noticeable and lasting improvement in your device’s battery performance.

Closure

Thus, we hope this article has provided valuable insights into Amazing Battery Life! 7 Power Tips for Smartphone Optimization. We appreciate your attention to our article. See you in our next article!
google.com

Effortless 5-Step Guide To Building Your Ultimate Gaming PC

0

Effortless 5-Step Guide to Building Your Ultimate Gaming PC

Introduction

With great pleasure, we will explore the intriguing topic related to Effortless 5-Step Guide to Building Your Ultimate Gaming PC. Let’s weave interesting information and offer fresh perspectives to the readers.

Effortless 5-Step Guide to Building Your Ultimate Gaming PC

Effortless 5-Step Guide to Building Your Ultimate Gaming PC

Building your own gaming PC can seem daunting, a project reserved for tech wizards. However, with a methodical approach and the right information, it’s a surprisingly achievable and incredibly rewarding experience. This guide breaks down the process into five manageable steps, guiding you through each stage with clear explanations and helpful tips, ensuring even a complete novice can assemble their dream gaming machine.

Step 1: Planning and Parts Selection – The Foundation of Your Success

Before you even think about touching a screwdriver, meticulous planning is crucial. This step sets the stage for a smooth build and a powerful, reliable PC. The most important aspect here is defining your budget and desired performance level. Are you aiming for a budget-friendly build capable of handling esports titles at high settings, or are you chasing the ultimate 4K ultra-high-definition gaming experience with maximum graphical fidelity? Your budget will dictate the components you can choose.

Determining Your Budget:

Set a realistic budget. PC components can be expensive, and it’s easy to get carried away. Start by determining the maximum amount you’re willing to spend. Consider this your absolute limit, factoring in any potential unexpected costs.

Choosing Your Components:

Once your budget is set, it’s time to select the individual components. Here’s a breakdown of the key parts and considerations:

  • CPU (Central Processing Unit): The brain of your PC. Intel’s Core i5 and i7 series, and AMD’s Ryzen 5 and 7 series, are popular choices for gaming. Higher core counts and clock speeds generally translate to better performance. Consider your budget and the games you plan to play when making your selection.

  • GPU (Graphics Processing Unit): The heart of your gaming experience. Nvidia’s GeForce RTX and AMD’s Radeon RX series offer various performance tiers. Higher-end GPUs deliver superior visuals and frame rates, especially at higher resolutions. Research benchmarks and reviews to find the best GPU within your budget.

  • Effortless 5-Step Guide to Building Your Ultimate Gaming PC

  • Motherboard: This is the central circuit board that connects all your components. It must be compatible with your chosen CPU and RAM. Consider features like the number of RAM slots, expansion slots (PCIe), and integrated Wi-Fi/Bluetooth. Ensure it supports the CPU socket type.

  • RAM (Random Access Memory): Crucial for smooth multitasking and game performance. 16GB of DDR4 or DDR5 RAM is a good starting point for gaming, while 32GB offers future-proofing for more demanding applications. Faster speeds (measured in MHz) generally improve performance.

  • Storage: You’ll need an SSD (Solid State Drive) for your operating system and frequently played games, providing significantly faster load times compared to traditional HDDs (Hard Disk Drives). Consider a large capacity SSD (1TB or more) and potentially a secondary HDD for mass storage of less frequently accessed files.

  • Power Supply Unit (PSU): Provides power to all your components. Choose a PSU with enough wattage to handle your system’s power demands, with some headroom for future upgrades. Aim for a reputable brand known for reliability and efficiency (80+ Bronze, Silver, or Gold certifications).

  • Effortless 5-Step Guide to Building Your Ultimate Gaming PC

    Case: The chassis that houses all your components. Consider airflow, size, and aesthetics. A well-ventilated case is essential for keeping temperatures down.

Step 2: Preparing Your Workspace – Setting the Stage for Success

A clean, well-lit, and spacious workspace is paramount for a successful build. Static electricity can damage sensitive components, so take the necessary precautions:

  • Static Electricity Prevention: Ground yourself by touching a grounded metal object (like a radiator or unpainted metal part of your computer case) before handling any components. Consider using an anti-static wrist strap for extra protection.

  • Workspace Organization: Clear a large, flat surface. Have all your components, tools (screwdrivers, zip ties, cable ties), and instructions readily accessible. Good lighting will help you see what you’re doing.

  • Gather Your Tools: You’ll need a Phillips head screwdriver (possibly multiple sizes), possibly a small flathead screwdriver, cable ties or zip ties, and potentially thermal paste (if your CPU cooler doesn’t come pre-applied).

Step 3: Assembling the Components – The Heart of the Build

This is where the actual construction begins. Follow these steps carefully:

  1. Install the CPU: Carefully place the CPU into the CPU socket on the motherboard, ensuring it’s correctly aligned. Gently lower the lever to secure it.

  2. Install the CPU Cooler: Apply thermal paste (if necessary) to the CPU before mounting the cooler. Ensure it’s securely fastened.

  3. Install RAM: Insert the RAM sticks into the appropriate slots on the motherboard, ensuring they click into place.

  4. Mount the Motherboard in the Case: Secure the motherboard to the case standoffs using screws.

  5. Install the GPU: Insert the GPU into a compatible PCIe slot on the motherboard and secure it with a retaining bracket.

  6. Install Storage Devices: Connect your SSD and/or HDD to the motherboard using SATA cables and power cables from the PSU.

  7. Connect the Power Supply: Secure the PSU to the case and connect the necessary power cables to the motherboard, GPU, and storage devices.

  8. Connect the Case Fans: Connect the case fans to the motherboard fan headers or a fan hub.

  9. Cable Management: Neatly route and tie up all the cables to improve airflow and aesthetics.

Step 4: Initial Boot and BIOS Setup – Bringing Your PC to Life

Once everything is connected, it’s time to see if your hard work has paid off:

  1. Connect Peripherals: Connect your monitor, keyboard, and mouse.

  2. Power On: Turn on the PC and listen for any unusual noises.

  3. Enter BIOS: Access the BIOS (Basic Input/Output System) settings by pressing the designated key (usually Delete, F2, F10, or F12) during startup.

  4. BIOS Configuration: Check that the BIOS recognizes all your components. You might need to adjust boot order to boot from your SSD. Save the BIOS settings and exit.

  5. Operating System Installation: If everything is working correctly, you can now install your operating system (Windows or Linux). Follow the on-screen instructions.

Step 5: Driver Installation and Testing – Fine-Tuning Your Masterpiece

After installing the operating system, you need to install the necessary drivers for your components:

  1. Driver Installation: Visit the manufacturer’s websites (Nvidia, AMD, Intel, etc.) to download and install the latest drivers for your GPU, chipset, and other components.

  2. System Benchmarking: Run benchmarking software (like 3DMark or Cinebench) to assess your system’s performance and ensure everything is working as expected.

  3. Game Testing: Play your favorite games to test the performance in real-world scenarios.

  4. Troubleshooting: If you encounter any problems, consult online resources, forums, or seek help from experienced builders.

Building your own gaming PC is a rewarding journey. It allows you to customize your system to your exact specifications, ensuring optimal performance and a personalized experience. By following these steps meticulously, you’ll be well on your way to enjoying the fruits of your labor – a powerful, customized gaming rig built by you. Remember to always consult your specific component manuals for detailed instructions and compatibility information. Good luck and happy gaming!

Closure

Thus, we hope this article has provided valuable insights into Effortless 5-Step Guide to Building Your Ultimate Gaming PC. We thank you for taking the time to read this article. See you in our next article!
google.com

Essential Guide: 5 Powerful Ways To Master Parental Controls

0

Essential Guide: 5 Powerful Ways to Master Parental Controls

Introduction

With great pleasure, we will explore the intriguing topic related to Essential Guide: 5 Powerful Ways to Master Parental Controls. Let’s weave interesting information and offer fresh perspectives to the readers.

Essential Guide: 5 Powerful Ways to Master Parental Controls

Essential Guide: 5 Powerful Ways to Master Parental Controls

Protecting your children online is a crucial responsibility in today’s digital age. The internet offers incredible opportunities for learning and connection, but it also exposes children to potential dangers, including inappropriate content, cyberbullying, and online predators. Setting up robust parental controls is no longer a luxury; it’s a necessity. This comprehensive guide will walk you through five powerful methods to safeguard your children’s online experience across various devices, empowering you to create a safer digital environment for your family.

1. Leveraging Operating System Built-in Controls:

Both Apple’s iOS (for iPhones and iPads) and Google’s Android (for Android phones and tablets) offer robust built-in parental control features. These are often the easiest starting point, providing a solid foundation for online safety. Let’s explore the key features and how to utilize them effectively:

  • Screen Time (iOS): This powerful tool allows you to set daily limits for app usage, schedule downtime, and even block specific apps during certain hours. You can create separate profiles for each child, customizing limits and restrictions based on their age and needs. The "Downtime" feature is particularly useful for enforcing "no screen time" periods before bed or during family time. You can also use the "Always Allowed" feature to exempt essential apps like communication apps from downtime.

  • Google Family Link (Android): Google Family Link is a dedicated app designed for parental control on Android devices. It allows you to manage app downloads and purchases, monitor app usage, locate your child’s device, and set digital wellbeing limits. You can also remotely lock or unlock the device, a crucial feature in emergency situations. The app provides detailed reports on your child’s activity, allowing you to monitor their online behavior and intervene if necessary. Family Link works best when paired with Google’s other services, providing a more comprehensive safety net.

  • Content Filtering: Both iOS and Android offer some level of content filtering, although the effectiveness varies. You can typically restrict access to explicit content, mature themes, and age-inappropriate apps. While these built-in filters are a good starting point, they may not be sufficient to block all potentially harmful content. This is where third-party apps and services come into play.

Essential Guide: 5 Powerful Ways to Master Parental Controls

Understanding the Limitations: While built-in controls are convenient and readily available, they have limitations. They may not cover all aspects of online safety, such as social media usage and online gaming. Furthermore, tech-savvy children may find ways to circumvent these controls. Therefore, it’s crucial to combine these built-in features with other parental control methods for comprehensive protection.

2. Employing Third-Party Parental Control Apps:

Numerous third-party apps provide more advanced parental control features than those built into operating systems. These apps often offer features like website blocking, app usage monitoring, location tracking, and even social media monitoring. Choosing the right app depends on your specific needs and budget. Some popular options include:

  • Qustodio: Qustodio offers comprehensive parental controls across multiple devices (computers, smartphones, tablets). It allows you to monitor app usage, block inappropriate websites, filter content, and track location. It also provides detailed reports on your child’s online activity.

  • Bark: Bark focuses on monitoring social media and messaging apps for signs of cyberbullying, self-harm, or other risky behaviors. It analyzes text messages, emails, and social media posts for potential red flags and alerts parents to potential issues.

  • Net Nanny: Net Nanny is a long-standing parental control solution that offers web filtering, app blocking, and time management features. It’s known for its strong content filtering capabilities and its ability to block access to inappropriate websites and content.

  • Essential Guide: 5 Powerful Ways to Master Parental Controls

  • Norton Family: Norton Family provides comprehensive protection across various devices, including web filtering, app control, location tracking, and online activity monitoring. It is integrated with other Norton security products, providing a holistic approach to online safety.

Choosing the Right App: When selecting a third-party app, consider factors such as the range of devices it supports, the level of control it offers, its ease of use, and its cost. Read reviews and compare features before making a decision. Remember that no app is foolproof, and it’s essential to combine app-based controls with open communication and education.

3. Utilizing Router-Based Parental Controls:

Many modern routers offer built-in parental control features. These controls work at the network level, meaning they can filter content and restrict access for all devices connected to your home Wi-Fi network. This is particularly useful for devices that may not have operating system-level parental controls, such as smart TVs or game consoles.

Features typically included in router-based parental controls include:

  • Website Blocking: You can create a list of websites to block, preventing access to inappropriate or harmful content.

  • Time Scheduling: You can schedule internet access, allowing internet access only during specific times of the day.

  • Content Filtering: Some routers offer content filtering based on age ratings or keywords.

  • Device Management: You can manage the devices connected to your network and restrict access for specific devices.

Setting up router-based controls: The process varies depending on your router model. Consult your router’s manual for instructions on how to access and configure the parental control settings. This method is an effective layer of protection, but it may not be sufficient on its own.

4. Open Communication and Education:

Technology is constantly evolving, and parental controls alone are not a complete solution. Open communication and education are essential components of online safety. Talk to your children about online safety, explain the potential risks, and teach them how to navigate the internet responsibly.

  • Discuss online dangers: Explain the risks of cyberbullying, online predators, and inappropriate content.

  • Establish clear rules: Set clear rules for online behavior and internet usage.

  • Teach critical thinking: Encourage your children to think critically about the information they encounter online and to be cautious about sharing personal information.

  • Promote responsible social media use: Teach your children how to use social media safely and responsibly.

  • Encourage open communication: Create a safe space where your children feel comfortable talking to you about their online experiences and any concerns they may have.

5. Regularly Review and Update Controls:

Parental controls are not a "set it and forget it" solution. Regularly review and update your controls to ensure they are still effective and appropriate for your children’s age and maturity level. As your children grow older, their needs and online activities will change, requiring adjustments to your parental control strategies. Technology also evolves rapidly, so keeping your software updated and exploring new parental control features is crucial.

  • Check for updates: Regularly update your parental control apps and your router’s firmware to benefit from the latest security features and bug fixes.

  • Review activity logs: Periodically review the activity logs provided by your parental control apps or router to monitor your children’s online activities and identify any potential issues.

  • Adapt to changing needs: As your children grow older, adjust your parental control settings to reflect their increasing maturity and independence.

  • Stay informed: Stay updated on the latest online threats and trends to better protect your children.

In conclusion, creating a safe online environment for your children requires a multi-faceted approach. Combining operating system features, third-party apps, router controls, open communication, and regular review will provide a robust and adaptable parental control system. Remember, the goal is not to restrict your children’s access to the internet entirely, but to equip them with the knowledge and tools to navigate the digital world safely and responsibly. By implementing these five powerful strategies, you can empower your children to explore the internet’s boundless opportunities while minimizing the risks.

Closure

Thus, we hope this article has provided valuable insights into Essential Guide: 5 Powerful Ways to Master Parental Controls. We thank you for taking the time to read this article. See you in our next article!
google.com

Amazingly Fast: 7 Powerful Ways To Supercharge Your Internet Speed

0

Amazingly Fast: 7 Powerful Ways to Supercharge Your Internet Speed

Introduction

In this auspicious occasion, we are delighted to delve into the intriguing topic related to Amazingly Fast: 7 Powerful Ways to Supercharge Your Internet Speed. Let’s weave interesting information and offer fresh perspectives to the readers.

Amazingly Fast: 7 Powerful Ways to Supercharge Your Internet Speed

Amazingly Fast: 7 Powerful Ways to Supercharge Your Internet Speed

Slow internet is the bane of modern life. Whether you’re trying to stream a movie, work from home, or simply browse social media, sluggish speeds can quickly turn a pleasant experience into a frustrating ordeal. But don’t despair! While you might not be able to magically conjure faster internet from thin air, there are several practical steps you can take to significantly improve your connection. This article will explore seven powerful strategies to help you diagnose and solve common internet speed problems, transforming your online experience from agonizingly slow to amazingly fast.

1. Identify the Bottleneck: Diagnosing Your Speed Issues

Before you start troubleshooting, you need to understand where the problem lies. Is it your internet plan itself, your Wi-Fi network, your devices, or something else entirely? Several tools can help you pinpoint the bottleneck.

  • Speed Tests: Numerous websites offer free speed tests (Ookla’s Speedtest.net is a popular choice). Run several tests at different times of day to get a more accurate picture of your average speed. Note the download and upload speeds, as well as ping (latency). Low ping is crucial for responsive online gaming and video calls. Compare your results to the speed promised by your internet service provider (ISP). If you’re consistently getting much slower speeds, contact your ISP.

  • Check Your Router’s Performance: Your router is the central hub of your home network. A malfunctioning or outdated router can significantly impact your speed. Check the router’s lights – blinking lights usually indicate activity, while consistently lit lights might suggest a problem. Consider restarting your router by unplugging it for 30 seconds and then plugging it back in.

  • Investigate Device-Specific Issues: A slow internet connection might not be a network problem at all; it could be a problem with your computer, smartphone, or other device. Try connecting other devices to your network to see if the slow speed is isolated to a particular device. Outdated drivers, malware, or insufficient RAM can all contribute to slow performance. Run a malware scan and ensure your device’s drivers are up-to-date.

  • Amazingly Fast: 7 Powerful Ways to Supercharge Your Internet Speed

    Network Congestion: The number of devices connected to your network simultaneously can significantly impact your speed. Too many devices streaming videos or downloading files at the same time will inevitably slow things down. Prioritize devices and limit simultaneous streaming or downloads if possible.

2. Optimize Your Router Placement and Configuration

The placement and configuration of your router are crucial for optimal Wi-Fi performance. A poorly placed router can lead to significant signal degradation and slower speeds.

  • Optimal Location: Place your router in a central location, away from walls, large metal objects, and other electronic devices that can interfere with the signal. The higher the router, the better the signal distribution. Avoid placing it in a corner or behind furniture.

  • Router Channels: Wi-Fi routers operate on different channels. Overlapping channels from neighboring networks can cause interference. Use a Wi-Fi analyzer app (available for smartphones and computers) to identify the least congested channels in your area and change your router’s channel accordingly.

  • Amazingly Fast: 7 Powerful Ways to Supercharge Your Internet Speed

    Firmware Updates: Just like your devices, your router needs regular firmware updates. These updates often include performance enhancements and security patches. Check your router’s manufacturer website for the latest firmware version.

  • Wi-Fi Band Selection: Most modern routers support both 2.4 GHz and 5 GHz Wi-Fi bands. The 5 GHz band offers faster speeds but has a shorter range, while the 2.4 GHz band has a longer range but slower speeds. Choose the band that best suits your needs. If you’re close to the router, use 5 GHz; otherwise, stick to 2.4 GHz.

3. Upgrade Your Internet Plan

Sometimes, the simplest solution is the most effective. If you’ve exhausted all other options and your internet speed is still unsatisfactory, it might be time to upgrade your internet plan. Contact your ISP to explore faster options available in your area. Consider factors like data caps and contract terms before making a decision.

4. Reduce Network Congestion:

As mentioned earlier, multiple devices vying for bandwidth can severely impact your internet speed. Here’s how to manage network congestion effectively:

  • Prioritize Devices: Determine which devices require the most bandwidth (e.g., streaming devices, gaming consoles) and prioritize their access to the network.

  • Limit Background Processes: Many applications and services run in the background, consuming bandwidth even when you’re not actively using them. Close unnecessary applications and disable background processes to free up bandwidth.

  • Quality of Service (QoS): Most modern routers offer QoS settings. This allows you to prioritize certain types of traffic (e.g., online gaming) over others, ensuring smoother performance for your most important applications.

5. Eliminate Interference:

Wireless signals can be susceptible to interference from various sources. Minimizing interference can significantly improve your Wi-Fi speed.

  • Cordless Phones: Older cordless phones operating on the 2.4 GHz frequency can interfere with your Wi-Fi signal. Try switching to a cordless phone using a different frequency or moving your router away from the phone.

  • Microwaves: Microwaves operate on the same frequency as some Wi-Fi networks and can cause interference. Try not to use your microwave and stream simultaneously.

  • Other Electronic Devices: Other electronic devices, such as Bluetooth speakers and baby monitors, can also cause interference. Try moving your router away from these devices.

6. Employ a Wi-Fi Extender or Mesh Network:

If your Wi-Fi signal doesn’t reach all areas of your home effectively, consider using a Wi-Fi extender or a mesh network.

  • Wi-Fi Extenders: Wi-Fi extenders boost your existing Wi-Fi signal, extending its range. However, they can sometimes reduce overall speed.

  • Mesh Networks: Mesh networks consist of multiple nodes that work together to create a seamless Wi-Fi network throughout your home. They generally offer better performance and more reliable coverage than Wi-Fi extenders.

7. Regularly Maintain Your Network:

Regular maintenance is crucial for optimal network performance.

  • Restart Your Router and Modem Regularly: Restarting your router and modem at least once a week can help clear out any temporary glitches or bugs.

  • Scan for Malware Regularly: Malware can consume bandwidth and slow down your internet speed. Regularly scan your devices for malware and remove any infections.

  • Update Your Drivers: Outdated drivers can lead to performance issues. Ensure that all your network drivers are up-to-date.

By implementing these seven powerful strategies, you can significantly improve your internet speed and enjoy a smoother, faster online experience. Remember that a combination of these techniques often yields the best results. Don’t be afraid to experiment and find the solutions that work best for your specific situation. A little troubleshooting can go a long way in transforming your frustratingly slow internet into an amazingly fast and reliable connection.

Closure

Thus, we hope this article has provided valuable insights into Amazingly Fast: 7 Powerful Ways to Supercharge Your Internet Speed. We hope you find this article informative and beneficial. See you in our next article!
google.com

Secure Your Future: 5 Crucial Steps To Ultimate Data Backup

0

Secure Your Future: 5 Crucial Steps to Ultimate Data Backup

Introduction

In this auspicious occasion, we are delighted to delve into the intriguing topic related to Secure Your Future: 5 Crucial Steps to Ultimate Data Backup. Let’s weave interesting information and offer fresh perspectives to the readers.

Secure Your Future: 5 Crucial Steps to Ultimate Data Backup

Secure Your Future: 5 Crucial Steps to Ultimate Data Backup

Losing your precious data – photos, videos, documents, financial records – is a catastrophic event. It can disrupt your life, damage your business, and leave you feeling helpless. But it doesn’t have to be this way. With a robust and well-planned backup strategy, you can safeguard your digital life and sleep soundly knowing your information is secure. This comprehensive guide outlines five crucial steps to achieve ultimate data backup, ensuring peace of mind and minimizing the risk of irreversible data loss.

Step 1: Assess Your Data and Identify Critical Information

Before diving into the technical aspects of backup solutions, take the time to understand what data you need to protect and prioritize. This initial assessment is crucial for creating an effective backup strategy tailored to your specific needs.

Begin by categorizing your data. This might involve dividing your information into different categories such as:

  • Essential Documents: Tax returns, legal documents, insurance policies, birth certificates, passports, wills, and other critical paperwork. Losing this data can have severe legal and financial consequences.
  • Financial Information: Bank statements, investment records, credit card details, loan documents, and other financial records. The loss of this data can lead to significant financial difficulties.
  • Personal Photos and Videos: Irreplaceable memories captured over the years. These are often emotionally valuable and impossible to recover.
  • Work-Related Files: Projects, presentations, client data, and other business-critical information. Data loss in a professional context can be devastating to productivity and profitability.
  • Software and Applications: While often replaceable, reinstalling software and reconfiguring settings can be time-consuming and disruptive.

Once you’ve categorized your data, prioritize it based on its importance and irreplaceability. Assign a criticality level to each category (e.g., critical, important, less important) to guide your backup strategy. Critical data requires more frequent backups and potentially multiple backup locations.

Consider the volume of data you need to back up. This will influence the type of storage solution you choose. For small amounts of data, a simple external hard drive might suffice. However, for large datasets, cloud storage or a network-attached storage (NAS) device may be more appropriate.

Step 2: Choose the Right Backup Method

Secure Your Future: 5 Crucial Steps to Ultimate Data Backup

There are several methods for backing up your data, each with its own advantages and disadvantages. The best method depends on your specific needs, budget, and technical expertise.

  • Full Backups: A full backup copies all selected data to the backup location. It’s the most comprehensive approach but can be time-consuming, especially for large datasets. It’s typically used less frequently, perhaps monthly or quarterly, depending on your data change rate.

  • Incremental Backups: This method only copies the data that has changed since the last backup. This is significantly faster and more efficient than full backups, but requires a full backup to be performed initially. This is ideal for daily or weekly backups.

  • Differential Backups: This method copies all data that has changed since the last full backup. This approach is faster than full backups but slower than incremental backups. It offers a good balance between speed and recovery time.

  • Cloud Storage: Services like Google Drive, Dropbox, iCloud, and OneDrive offer convenient and accessible cloud-based backup solutions. They are easy to use and often offer automatic backups. However, they rely on internet connectivity and may have limitations on storage space and cost.

    Secure Your Future: 5 Crucial Steps to Ultimate Data Backup

  • External Hard Drives: These are a cost-effective and reliable option for local backups. They offer large storage capacities and are relatively easy to use. However, they are susceptible to physical damage and theft. Consider using multiple external drives and storing them in different locations.

  • Network-Attached Storage (NAS): A NAS device is a dedicated storage device that connects to your network, allowing multiple users to access and back up data. They offer high storage capacity, accessibility, and often include advanced features like RAID (Redundant Array of Independent Disks) for data redundancy.

  • 3-2-1 Backup Rule: This industry-standard rule recommends having three copies of your data, on two different media types, with one copy stored offsite. This ensures data protection even in the event of hardware failure, natural disasters, or theft.

Step 3: Implement Your Backup Strategy

Once you’ve chosen your backup method(s), it’s time to implement your strategy. This involves setting up your chosen backup solution, configuring the backup schedule, and testing your backups to ensure they are working correctly.

For local backups (external hard drives or NAS), schedule regular backups. The frequency depends on how often your data changes. For critical data, daily backups might be necessary. For less critical data, weekly or monthly backups might be sufficient.

For cloud backups, utilize the automatic backup features offered by your chosen service. Ensure that your cloud storage provider offers sufficient security measures to protect your data from unauthorized access.

Regardless of the method you choose, it’s crucial to test your backups regularly. Try restoring a few files or folders to ensure that your backups are complete and recoverable. This will help identify any potential issues before a catastrophic data loss occurs.

Step 4: Secure Your Backup Locations

The security of your backup locations is just as important as the backup process itself. Your backups are useless if they are compromised or inaccessible.

For local backups, consider physical security measures such as storing your external hard drives in a safe place, away from potential hazards like fire, water, or theft. Use strong passwords to protect your NAS device and encrypt your backup data.

For cloud backups, choose a reputable provider with robust security features, including encryption, multi-factor authentication, and regular security audits. Review your provider’s security policies and ensure they meet your security requirements.

Regularly review and update your security measures. As threats evolve, your security practices must adapt to maintain the integrity of your backups.

Step 5: Regularly Review and Update Your Backup Strategy

Your data backup strategy is not a one-time task. It requires ongoing monitoring, review, and updates. Regularly review your backup strategy to ensure it continues to meet your needs. This includes:

  • Checking backup frequency: Ensure your backup schedule is still appropriate for your data usage patterns.
  • Verifying backup integrity: Regularly test your backups to ensure they are recoverable.
  • Updating backup media: Replace outdated or failing backup media.
  • Reviewing storage capacity: Ensure you have sufficient storage capacity to accommodate your growing data needs.
  • Updating security measures: Keep your security software up-to-date and review your security practices to address any emerging threats.

By regularly reviewing and updating your backup strategy, you can ensure your data remains safe and secure, even in the face of unexpected events. The time and effort invested in creating a robust and well-maintained backup strategy are far outweighed by the potential consequences of data loss.

In conclusion, safeguarding your digital assets requires a proactive and multifaceted approach. By following these five crucial steps, you can build a robust and reliable data backup system that provides ultimate protection against data loss and ensures peace of mind. Remember, the best backup strategy is the one you consistently implement and regularly review. Don’t delay – protect your valuable data today.

Closure

Thus, we hope this article has provided valuable insights into Secure Your Future: 5 Crucial Steps to Ultimate Data Backup. We thank you for taking the time to read this article. See you in our next article!
google.com

Conquer Digital Chaos: 5 Ultimate Strategies For Effortless File Organization

0

Conquer Digital Chaos: 5 Ultimate Strategies for Effortless File Organization

Introduction

With great pleasure, we will explore the intriguing topic related to Conquer Digital Chaos: 5 Ultimate Strategies for Effortless File Organization. Let’s weave interesting information and offer fresh perspectives to the readers.

Conquer Digital Chaos: 5 Ultimate Strategies for Effortless File Organization

Conquer Digital Chaos: 5 Ultimate Strategies for Effortless File Organization

The digital age has gifted us with unparalleled access to information, but it’s also created a monster: the ever-growing, chaotic mess of digital files. From stray images to crucial documents, the sheer volume can feel overwhelming, leading to wasted time searching, missed deadlines, and even data loss. But fear not! Conquering this digital chaos is entirely possible with a strategic approach. This guide outlines five powerful strategies to help you tame your digital beast and achieve effortless file organization.

1. Establish a Consistent Naming Convention:

This seemingly simple step is the cornerstone of effective digital organization. Inconsistent naming conventions are the breeding ground for confusion and wasted time. Imagine searching for "project alpha report final.docx" when you’ve also saved it as "project alpha final report.doc," "project alpha-final.docx," or even "final report project alpha.doc." The time spent hunting down the right file could be spent on more productive tasks.

To avoid this, create a clear and consistent naming convention that you stick to religiously. Here are some best practices:

  • Use descriptive names: Avoid vague names like "Document1" or "Image2." Instead, use specific and descriptive names that clearly indicate the file’s content. For example, instead of "Image2.jpg," use "MarketingCampaign_Banner_July2024.jpg."

  • Maintain a logical order: Use a consistent order for keywords in your filenames. For example, you could use "Project Name_Date_Version_Description.filetype." This ensures that files are easily sorted alphabetically or chronologically.

  • Use underscores instead of spaces: Spaces can cause problems in some operating systems and applications. Underscores provide a clean and consistent alternative.

  • Conquer Digital Chaos: 5 Ultimate Strategies for Effortless File Organization

  • Be concise but informative: Aim for names that are informative enough to understand the file’s content without being overly long or cumbersome.

  • Version control: Include version numbers in your filenames (e.g., "Report_v1.docx," "Report_v2.docx") to keep track of different iterations of the same document. This is especially crucial for collaborative projects.

  • Apply the convention across all file types: Maintain consistency across all file types (documents, images, videos, etc.) to avoid confusion.

2. Implement a Robust Folder Structure:

A well-defined folder structure is the backbone of any effective digital filing system. It provides a logical framework for organizing your files, making it easy to locate what you need when you need it. A haphazard collection of files strewn across various folders will only lead to frustration and wasted time.

Here are some suggestions for creating a robust folder structure:

Conquer Digital Chaos: 5 Ultimate Strategies for Effortless File Organization

  • Start with a top-level folder: This folder should be the root of your entire file system. It could be named something like "Digital Archives," "My Documents," or something equally descriptive.

  • Create subfolders based on project, type, or topic: Organize your files into subfolders based on categories that make sense for your workflow. For example, you might have subfolders for "Work," "Personal," "Projects," "Finances," etc. Within each of these, create further subfolders as needed. For projects, you might have folders for "Project Alpha," "Project Beta," etc., with subfolders for "Documents," "Images," "Spreadsheets," etc., within each project folder.

  • Use a hierarchical structure: Organize your folders in a hierarchical manner, creating a clear and logical path from the top-level folder to the individual files.

  • Limit folder depth: Avoid creating excessively deep folder structures (more than three or four levels). This can make it difficult to navigate and find files.

  • Regularly review and reorganize: As your needs evolve, you may need to adjust your folder structure. Regularly review your system and reorganize as needed to ensure it remains efficient and effective.

3. Leverage Cloud Storage and Synchronization:

Cloud storage services like Google Drive, Dropbox, OneDrive, and iCloud offer invaluable benefits for managing digital files. These services provide:

  • Accessibility: Access your files from anywhere with an internet connection.
  • Backup and redundancy: Your files are backed up to the cloud, protecting against data loss due to hardware failure or other unforeseen events.
  • Collaboration: Easily share files and collaborate with others on projects.
  • Version history: Many cloud services maintain version history, allowing you to revert to previous versions of your files if necessary.
  • Synchronization: Your files are synchronized across multiple devices, ensuring that you always have access to the latest versions.

Choosing a cloud storage service depends on your individual needs and preferences. Consider factors such as storage capacity, cost, features, and integration with other applications. However, utilizing cloud storage is highly recommended for ensuring data security and accessibility.

4. Utilize Metadata and Tagging:

Metadata and tagging offer powerful ways to enhance file organization beyond just folder structures and filenames. Metadata refers to data about data, such as creation date, author, keywords, and descriptions. Tagging involves adding keywords or labels to files to categorize them further.

Most operating systems and applications allow you to add metadata to files. Many image editing programs, for instance, allow you to add keywords, descriptions, and copyright information. Similarly, you can use tagging features in cloud storage services or file management tools to add additional layers of categorization.

By effectively utilizing metadata and tagging, you can quickly find files based on various criteria, such as date, author, project, or topic. This significantly improves search efficiency and reduces the time spent hunting for specific files.

5. Regularly Purge and Archive:

Regularly purging and archiving unnecessary files is crucial for maintaining a clean and organized digital environment. Over time, digital clutter accumulates, slowing down your computer and making it harder to find what you need.

Here’s a strategy for effective purging and archiving:

  • Regularly review your files: Set aside time each week or month to review your files and delete or archive those you no longer need.

  • Delete unnecessary files: Delete any files that are duplicates, outdated, or irrelevant.

  • Archive important files: Archive important files that you don’t need to access frequently but want to keep for future reference. You can archive files to external hard drives, cloud storage, or specialized archiving software.

  • Use a file management tool: Consider using a file management tool to help you identify and manage large files or duplicates. Many tools offer automated cleanup features.

  • Establish a retention policy: Develop a retention policy that specifies how long you need to keep different types of files. This will help you determine which files can be safely deleted or archived.

By consistently implementing these five strategies, you can transform your digital chaos into a well-organized and efficient system. Remember, consistent effort is key. Start small, focus on one area at a time, and gradually build a system that works for your unique needs. The time invested in establishing a robust digital filing system will pay dividends in increased productivity, reduced stress, and peace of mind knowing your valuable digital assets are readily accessible and secure.

Closure

Thus, we hope this article has provided valuable insights into Conquer Digital Chaos: 5 Ultimate Strategies for Effortless File Organization. We thank you for taking the time to read this article. See you in our next article!
google.com

Effortless Smart Home Setup: 5 Essential Steps To Automation Bliss

0

Effortless Smart Home Setup: 5 Essential Steps to Automation Bliss

Introduction

With great pleasure, we will explore the intriguing topic related to Effortless Smart Home Setup: 5 Essential Steps to Automation Bliss. Let’s weave interesting information and offer fresh perspectives to the readers.

Effortless Smart Home Setup: 5 Essential Steps to Automation Bliss

Effortless Smart Home Setup: 5 Essential Steps to Automation Bliss

Creating a smart home can feel overwhelming. The sheer number of devices, apps, and protocols can be enough to deter even the most tech-savvy individuals. However, with a structured approach, building your dream automated haven is surprisingly straightforward and incredibly rewarding. This guide will walk you through five essential steps, transforming your home from ordinary to extraordinary with minimal stress and maximum efficiency.

Step 1: Defining Your Smart Home Vision and Needs Assessment

Before plunging into the world of smart devices, take the time to carefully consider your goals. What aspects of your home life do you want to improve? Are you aiming for increased security, enhanced energy efficiency, greater convenience, or a blend of all three? A clear vision will guide your purchasing decisions and prevent you from accumulating unnecessary gadgets.

This initial phase involves a thorough needs assessment. Consider the following questions:

  • Security: Do you want smart locks, security cameras, motion detectors, or a comprehensive security system? What level of security do you require? Do you need integration with local law enforcement?
  • Energy Efficiency: Are you looking to reduce energy consumption through smart thermostats, smart lighting, or power monitoring systems? What are your energy usage patterns? Could automated scheduling save you money?
  • Convenience: Do you desire voice-controlled devices, automated lighting schedules, remote appliance control, or automated blinds? What are your daily routines, and how could technology streamline them?
  • Entertainment: Do you want to integrate your smart home with your entertainment system, allowing for voice-controlled music playback, smart TVs, and seamless streaming?
  • Accessibility: Do you require features that enhance accessibility for elderly family members or individuals with disabilities? This could include voice control for lights and appliances, automated door openers, or fall detection systems.

Once you’ve answered these questions, you’ll have a much clearer picture of the specific smart home features you need. This will help you avoid buying unnecessary devices and ensure that your system is tailored to your unique lifestyle and requirements. Don’t be afraid to start small; you can always expand your system over time.

Step 2: Choosing a Smart Home Hub (or Ecosystem)

The heart of your smart home is the hub. This central device acts as the communication bridge between all your smart devices. Choosing the right hub is crucial for ensuring seamless integration and compatibility. There are several popular options, each with its strengths and weaknesses:

Effortless Smart Home Setup: 5 Essential Steps to Automation Bliss

  • Amazon Alexa (Echo devices): Alexa is a popular choice thanks to its extensive device compatibility, robust voice assistant capabilities, and user-friendly interface. Its ecosystem includes a wide range of smart home devices from various manufacturers.
  • Google Home (Google Nest devices): Google Home offers similar functionality to Alexa, boasting strong voice recognition and a large app ecosystem. Its integration with other Google services is a significant advantage.
  • Apple HomeKit: Apple’s HomeKit is a closed ecosystem, meaning that devices must be specifically certified to work with it. This ensures a high level of security and stability, but limits the range of compatible devices.
  • Samsung SmartThings: Samsung’s SmartThings hub offers a strong focus on connectivity and compatibility with a wide range of devices. Its robust platform supports various protocols, making it a versatile option.

Consider factors like the existing devices you own, your preferred voice assistant, and the level of control you desire when selecting your hub. Research reviews and compare features before making a decision. It’s important to note that you can sometimes integrate devices from multiple ecosystems, although this might require more complex configurations.

Step 3: Selecting and Installing Your Smart Devices

With your hub chosen, it’s time to select and install your smart devices. Prioritize the devices that align with your identified needs and budget. Start with a few core devices and gradually expand your system over time. Here are some popular categories:

  • Smart Lighting: Smart bulbs offer convenient control over lighting schedules, color temperature, and brightness. Consider smart switches for controlling existing light fixtures.
  • Smart Thermostats: Smart thermostats learn your preferences and automatically adjust the temperature to optimize energy efficiency and comfort.
  • Smart Locks: Smart locks provide keyless entry and remote access control, enhancing security and convenience.
  • Effortless Smart Home Setup: 5 Essential Steps to Automation Bliss

  • Smart Security Cameras: Security cameras offer remote monitoring and recording capabilities, providing peace of mind when you’re away from home.
  • Smart Plugs: Smart plugs allow you to control any electrical appliance remotely, adding smart functionality to existing devices.
  • Smart Speakers: Smart speakers provide voice control for your smart home devices and access to various entertainment features.

When selecting devices, pay attention to compatibility with your chosen hub. Check reviews and compare features before purchasing. The installation process varies depending on the device, but most are relatively straightforward. Follow the manufacturer’s instructions carefully.

Step 4: Setting Up and Configuring Your Smart Home System

Once you’ve acquired your smart devices, it’s time to set them up and configure them within your chosen smart home ecosystem. This typically involves downloading the relevant app, creating an account, and following the on-screen instructions. Most devices use Bluetooth or Wi-Fi for communication with the hub.

This stage requires patience and attention to detail. Ensure that your devices are connected to your Wi-Fi network and properly configured within the app. Test each device to ensure it’s functioning correctly. This includes checking for responsiveness, functionality, and compatibility with other devices in your system.

Creating scenes and automations is a key part of this step. Scenes allow you to group multiple devices together and control them with a single command. Automations allow you to set up rules that trigger actions based on specific events, such as turning on the lights at sunset or adjusting the thermostat based on occupancy.

Step 5: Ongoing Maintenance and System Expansion

Setting up your smart home is just the beginning. Ongoing maintenance and system expansion are crucial for ensuring its continued smooth operation. Regularly check for software updates for your hub and devices to ensure optimal performance and security. This also involves monitoring your devices for any malfunctions and troubleshooting any issues that may arise.

As your needs evolve, you can expand your smart home system by adding new devices. Consider adding features like smart appliances, robotic vacuum cleaners, or smart irrigation systems. Remember to prioritize your needs and budget when making purchasing decisions.

Remember, building a smart home is an iterative process. Start small, focus on your key needs, and gradually expand your system over time. Don’t be afraid to experiment with different devices and features. The key to a successful smart home is careful planning, thoughtful selection of devices, and a willingness to learn and adapt. With a bit of patience and effort, you’ll soon be enjoying the convenience, security, and energy efficiency of your automated haven. The ultimate reward is a home that seamlessly adapts to your lifestyle, making daily life simpler, more comfortable, and more enjoyable.

Closure

Thus, we hope this article has provided valuable insights into Effortless Smart Home Setup: 5 Essential Steps to Automation Bliss. We appreciate your attention to our article. See you in our next article!
google.com

Amazingly Simple Ways To Supercharge Your Laptop’s Performance: 5 Essential Tips

0

Amazingly Simple Ways to Supercharge Your Laptop’s Performance: 5 Essential Tips

Introduction

With great pleasure, we will explore the intriguing topic related to Amazingly Simple Ways to Supercharge Your Laptop’s Performance: 5 Essential Tips. Let’s weave interesting information and offer fresh perspectives to the readers.

Amazingly Simple Ways to Supercharge Your Laptop’s Performance: 5 Essential Tips

Amazingly Simple Ways to Supercharge Your Laptop's Performance: 5 Essential Tips

Your laptop is your lifeline – a portal to work, entertainment, and connection. But as time passes, that once-nimble machine can become sluggish, frustratingly slow, and prone to crashes. Don’t despair! You don’t need to shell out for a new device just yet. With a few simple, proactive steps, you can dramatically improve your laptop’s performance and extend its lifespan. This guide will equip you with five essential tips to supercharge your laptop’s performance, keeping it running smoothly and efficiently for years to come.

1. The Power of Disk Cleanup: Decluttering Your Digital Drive

One of the most significant contributors to a slowing laptop is a cluttered hard drive or SSD. Over time, temporary files, system caches, and unnecessary programs accumulate, consuming valuable storage space and slowing down access times. Think of it like a cluttered desk – it’s harder to find what you need when everything is piled up.

The good news is that cleaning up your digital drive is surprisingly straightforward. Here’s a step-by-step guide:

  • Empty the Recycle Bin: This is the most basic but often overlooked step. Files in the Recycle Bin still occupy space on your hard drive. Regularly emptying it frees up space immediately.

  • Uninstall Unused Programs: Many laptops come pre-installed with software you may never use. Identify these programs and uninstall them. Go to your Control Panel (or Settings > Apps in Windows 10/11) and locate the list of installed programs. Select the ones you don’t need and uninstall them. Be cautious though, only uninstall programs you are sure you won’t need.

  • Delete Temporary Files: Temporary files are created by programs and the operating system to store temporary data. They often accumulate without your knowledge. Windows has a built-in Disk Cleanup utility that can help. Search for "Disk Cleanup" in the Windows search bar and run the utility. Select the file types you want to delete (be careful not to delete anything crucial).

  • Amazingly Simple Ways to Supercharge Your Laptop's Performance: 5 Essential Tips

  • Use a Third-Party Disk Cleaner: While Windows’ built-in tools are effective, third-party disk cleaners often offer more advanced features. CCleaner is a popular and free option, but many others are available. These tools can often identify and remove even more temporary files and junk data than the built-in tools. Always download these from reputable sources to avoid malware.

  • Regularly Delete Downloaded Files: We often download files and forget about them. Regularly review your Downloads folder and delete files you no longer need. This is especially important if you download large files, such as videos or software installers.

By regularly performing these steps, you’ll significantly reduce the clutter on your hard drive, freeing up space and improving your laptop’s overall performance. Consider scheduling regular disk cleanups as part of your routine maintenance.

2. The Importance of Software Updates: Keeping Your System Current

Software updates are not just about adding new features; they are crucial for maintaining your laptop’s performance and security. Updates often include performance improvements, bug fixes, and security patches that protect your system from vulnerabilities.

  • Windows Updates: Windows regularly releases updates that address security flaws and improve performance. Ensure that your Windows system is configured to automatically install updates. You can check for updates manually by going to Settings > Update & Security > Windows Update.

    Amazingly Simple Ways to Supercharge Your Laptop's Performance: 5 Essential Tips

  • Driver Updates: Drivers are software that allows your operating system to communicate with your hardware (e.g., graphics card, printer, mouse). Outdated or corrupted drivers can significantly impact performance. Check your device manufacturer’s website for the latest drivers for your specific hardware. You can also use driver update software, but proceed cautiously, ensuring you download from trusted sources.

  • Application Updates: Keep your applications updated as well. Many applications offer automatic updates, but it’s good practice to check periodically for new versions. Outdated applications can be buggy, slow, and may even have security vulnerabilities.

Regularly updating your software ensures that your laptop is running the most efficient and secure versions of its operating system and applications. This is a critical step in maintaining optimal performance.

3. Managing Startup Programs: Reducing Startup Load

When you start your laptop, many programs automatically launch in the background. These startup programs consume system resources, slowing down the boot process and reducing overall performance. Managing your startup programs can significantly improve boot times and overall responsiveness.

  • Windows Task Manager: In Windows, press Ctrl+Shift+Esc to open the Task Manager. Go to the "Startup" tab. This tab shows a list of programs that automatically start with Windows, along with their startup impact. You can disable programs you don’t need to start automatically. Be cautious, however; disabling crucial programs could lead to system instability.

  • Third-Party Startup Managers: Several third-party startup managers offer more advanced features for managing startup programs. These tools can provide more detailed information about the programs and allow for finer control over their startup behavior. Again, only download these from reputable sources.

By disabling unnecessary startup programs, you’ll reduce the load on your system at startup, leading to faster boot times and improved overall responsiveness.

4. The Crucial Role of RAM: Optimizing Memory Usage

RAM (Random Access Memory) is your laptop’s short-term memory. It stores the data your computer is currently using. Insufficient RAM can lead to slowdowns and crashes. While you can’t physically add RAM to all laptops easily, you can optimize its usage:

  • Close Unused Programs: Running too many programs simultaneously consumes RAM. Close programs you’re not actively using to free up RAM.

  • Limit Browser Tabs: Web browsers are notorious RAM hogs. Having too many tabs open can significantly impact performance. Close tabs you’re not actively using.

  • Monitor RAM Usage: Use the Task Manager (Windows) or Activity Monitor (macOS) to monitor your RAM usage. This will help you identify programs that are consuming a lot of RAM and allow you to take action.

  • Consider Upgrading RAM: If you frequently experience low RAM, upgrading your RAM is a cost-effective way to significantly improve performance. Check your laptop’s specifications to determine the type and amount of RAM it supports. This is often a relatively simple upgrade.

Optimizing RAM usage is essential for maintaining a responsive and efficient laptop. Closing unused programs and limiting browser tabs can make a big difference.

5. Regular Maintenance: A Proactive Approach

Regular maintenance is key to keeping your laptop running smoothly. Think of it as regular servicing for your car – it prevents bigger problems down the line.

  • Defragment Your Hard Drive (HDD Only): If you have a traditional hard drive (HDD), defragmenting it can improve performance. This process reorganizes files on the drive, making them easier to access. SSDs do not need defragmentation.

  • Run a Malware Scan: Regularly run a malware scan using a reputable antivirus program. Malware can significantly slow down your laptop and compromise your security.

  • Check for Overheating: Overheating can damage your laptop’s components and reduce performance. Ensure that your laptop’s vents are not blocked and that it’s operating in a well-ventilated area. Consider using a cooling pad if necessary.

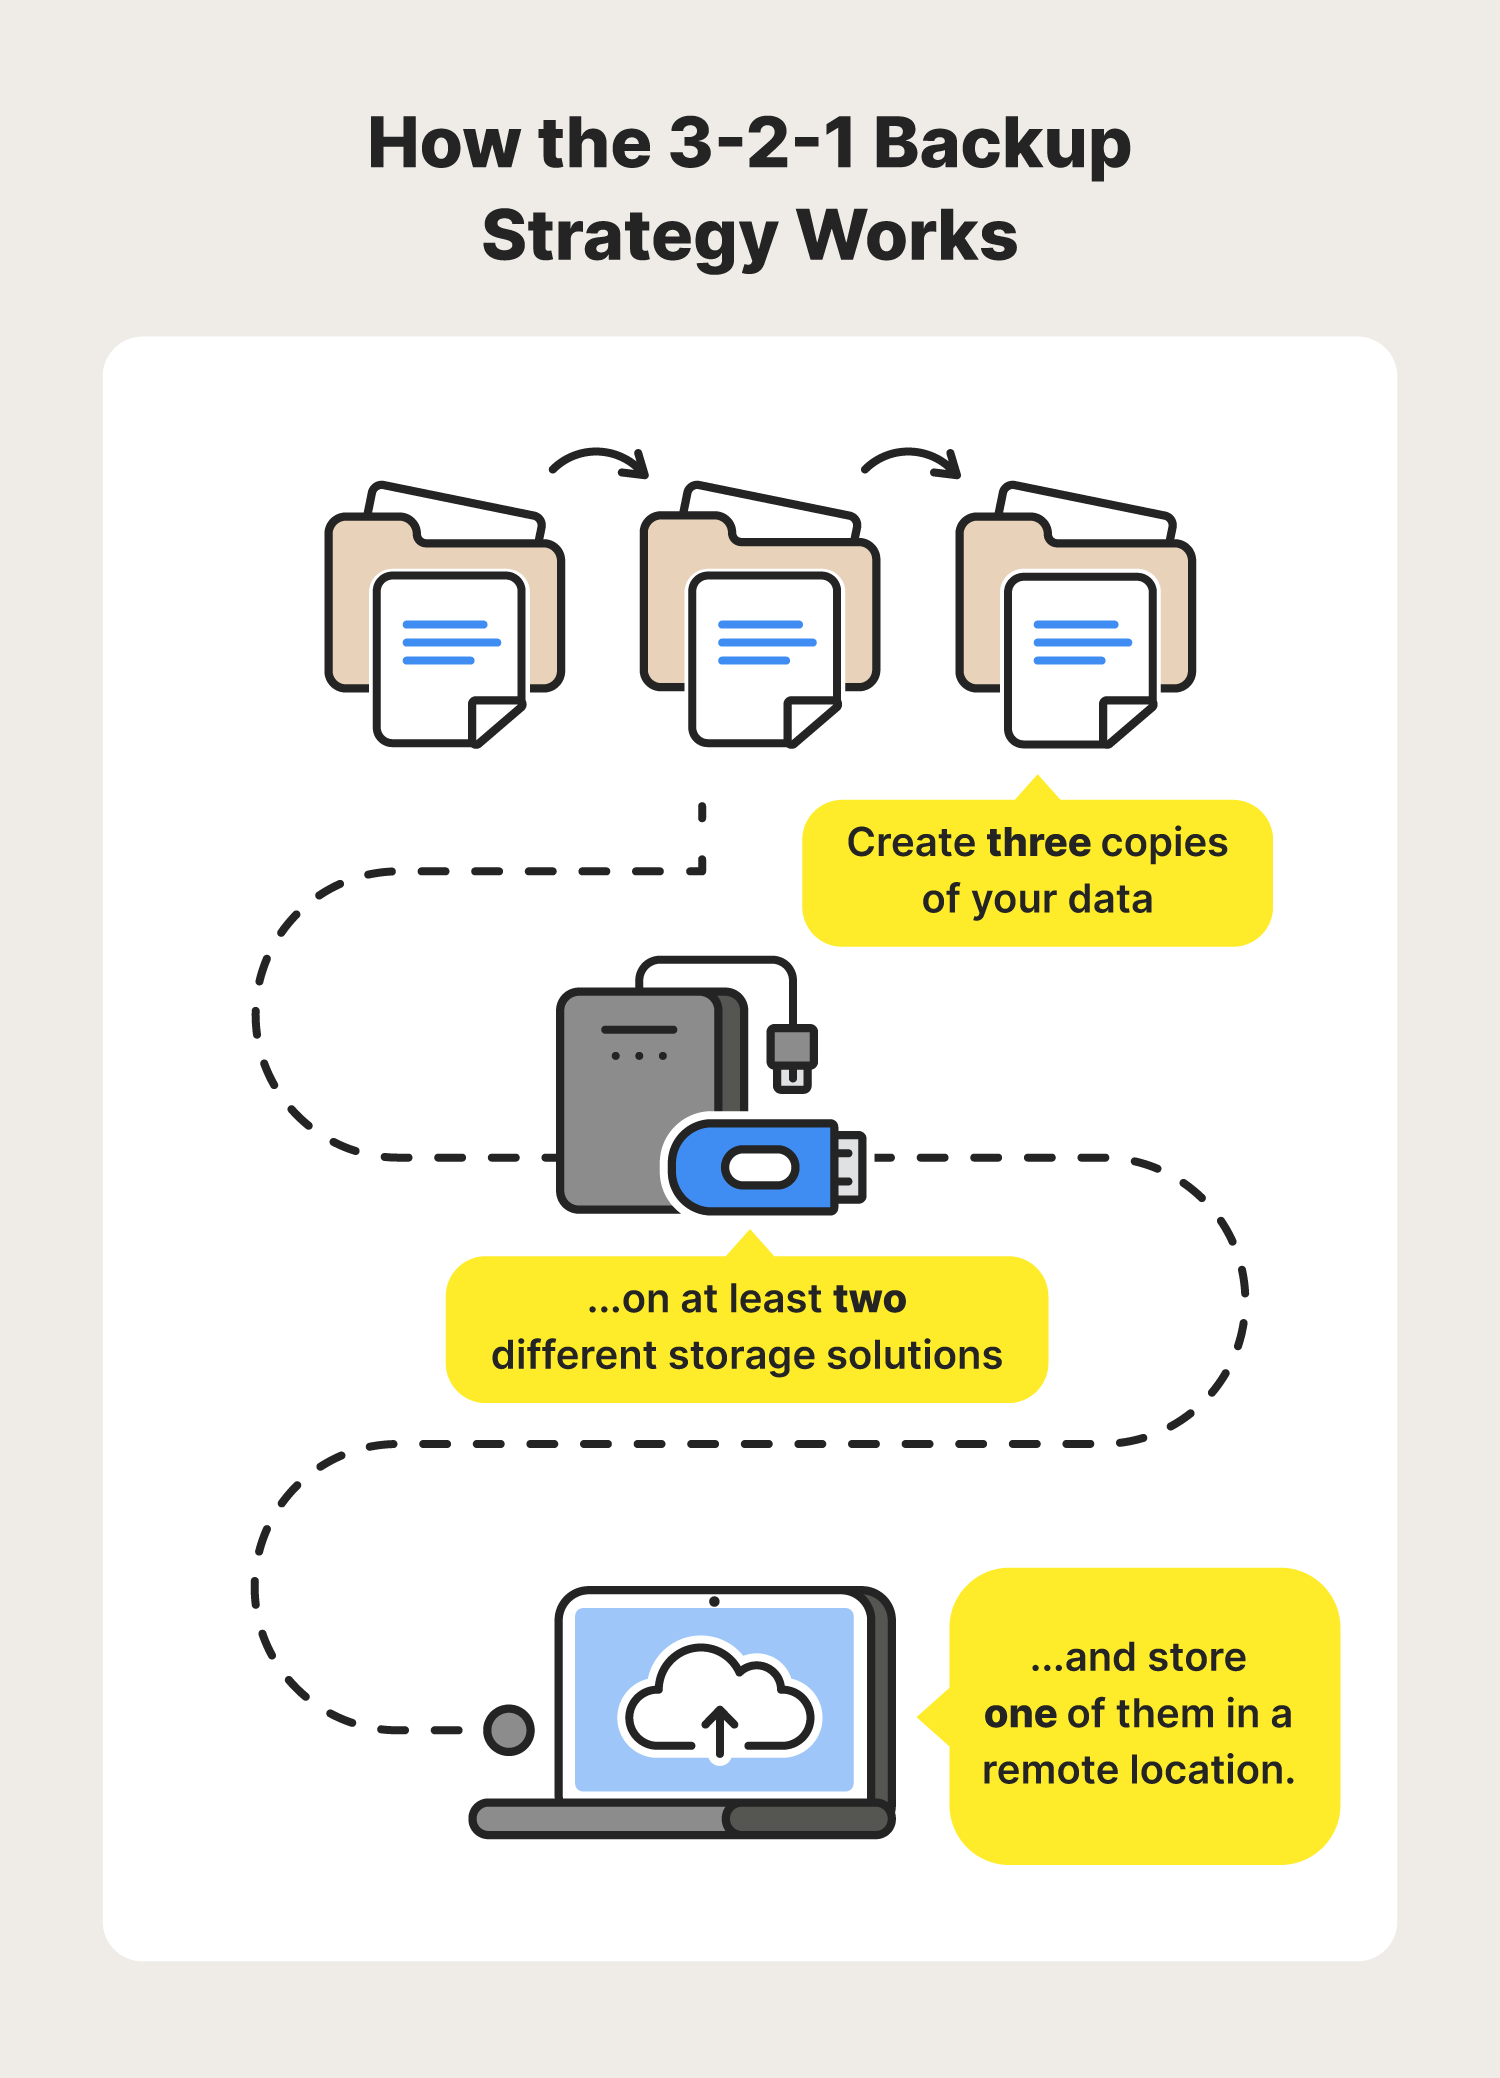
  • Back Up Your Data: Regularly back up your important data to an external hard drive or cloud storage. This protects you from data loss in case of a hard drive failure or other unforeseen events.

Regular maintenance is an investment in your laptop’s longevity and performance. By incorporating these practices into your routine, you’ll keep your laptop running smoothly and efficiently for years to come.

By diligently following these five essential tips, you can transform your laptop’s performance, breathing new life into your digital workspace. Remember, a little proactive maintenance goes a long way in ensuring your laptop remains a powerful and reliable tool for years to come. Don’t let a sluggish laptop slow you down – take control and unleash its full potential!

Closure

Thus, we hope this article has provided valuable insights into Amazingly Simple Ways to Supercharge Your Laptop’s Performance: 5 Essential Tips. We appreciate your attention to our article. See you in our next article!
google.com

Ultimate Guide: 7 Powerful Steps To Secure Your Digital Fortress

0

Ultimate Guide: 7 Powerful Steps to Secure Your Digital Fortress

Introduction

With great pleasure, we will explore the intriguing topic related to Ultimate Guide: 7 Powerful Steps to Secure Your Digital Fortress. Let’s weave interesting information and offer fresh perspectives to the readers.

Ultimate Guide: 7 Powerful Steps to Secure Your Digital Fortress

Ultimate Guide: 7 Powerful Steps to Secure Your Digital Fortress

The internet, a boundless realm of information and connection, presents a double-edged sword. While it offers unparalleled opportunities, it also exposes us to significant privacy risks. From data breaches to targeted advertising, the digital landscape is fraught with potential threats. But fear not! Securing your online privacy isn’t an insurmountable task. This comprehensive guide outlines seven powerful strategies to fortify your digital fortress and reclaim control over your personal information. By implementing these steps, you can significantly reduce your vulnerability and navigate the online world with greater confidence and peace of mind.

1. Password Management: The Cornerstone of Online Security

Weak or easily guessable passwords are the low-hanging fruit for cybercriminals. A single compromised password can grant access to numerous accounts, potentially exposing your personal data, financial information, and even your identity. Therefore, robust password management is paramount. Here’s how to elevate your password game:

  • Use a Password Manager: This is the single most impactful step you can take. Password managers generate strong, unique passwords for each of your accounts and securely store them, eliminating the need to remember countless complex combinations. Popular options include LastPass, 1Password, Bitwarden (open-source), and Dashlane. Choose one that suits your needs and budget, and ensure you protect the master password with the same level of diligence.

  • Implement Strong Password Practices: Even if you’re not using a password manager, strong passwords are essential. Avoid using easily guessable information like birthdays, pet names, or common words. Aim for passwords that are at least 12 characters long, combining uppercase and lowercase letters, numbers, and symbols. Consider using a passphrase – a memorable sentence or phrase – as a basis for your password, making it both strong and easy to recall.

  • Enable Two-Factor Authentication (2FA): 2FA adds an extra layer of security by requiring a second form of verification, such as a code sent to your phone or email, in addition to your password. This significantly reduces the risk of unauthorized access, even if your password is compromised. Enable 2FA wherever possible, especially for sensitive accounts like banking, email, and social media.

  • Ultimate Guide: 7 Powerful Steps to Secure Your Digital Fortress

    Regularly Review and Update Passwords: Periodically review your passwords and update them, especially if you suspect a breach or security incident. Consider using a password manager’s built-in features for automated password updates.

2. VPN: Shielding Your Online Activities

A Virtual Private Network (VPN) encrypts your internet traffic and masks your IP address, making it significantly harder for others to track your online activities. This is particularly crucial when using public Wi-Fi networks, which are often vulnerable to eavesdropping. A VPN offers several key benefits:

  • Enhanced Privacy: By encrypting your data, a VPN prevents internet service providers (ISPs), government agencies, and hackers from monitoring your browsing history, downloads, and online communications.

  • Anonymity: A VPN masks your IP address, making it difficult to trace your online activities back to your physical location. This is especially important if you’re accessing sensitive information or using online services that require anonymity.

  • Ultimate Guide: 7 Powerful Steps to Secure Your Digital Fortress

    Geo-Spoofing: VPNs allow you to connect to servers in different countries, enabling you to access geographically restricted content and bypass censorship.

  • Protection on Public Wi-Fi: Public Wi-Fi networks are notoriously insecure. Using a VPN on public Wi-Fi protects your data from potential eavesdroppers.

Choose a reputable VPN provider with a strong track record of security and privacy. Read reviews and compare features before making a decision.

3. Secure Your Browsing Habits

Your web browser is the gateway to the internet, and its security settings significantly impact your online privacy. Take these steps to enhance your browsing security:

  • Use a Secure Browser: While all major browsers offer security features, some are generally considered more privacy-focused than others. Consider using browsers like Firefox or Brave, which are known for their robust privacy settings and built-in ad blockers.

  • Enable Browser Extensions for Privacy: Many browser extensions can enhance your privacy and security. Consider using extensions that block trackers, ads, and malicious websites. However, be cautious when installing extensions, and only choose those from reputable sources.

  • Clear Your Browsing History and Cookies Regularly: Your browser stores your browsing history, cookies, and other data that can be used to track your online activities. Regularly clearing this data helps protect your privacy.

  • Be Wary of Phishing Attempts: Phishing emails and websites attempt to trick you into revealing your personal information. Be cautious of unsolicited emails and links, and verify the authenticity of websites before entering any sensitive information.

  • Use HTTPS: Always ensure that the websites you visit use HTTPS, indicated by a padlock icon in the address bar. HTTPS encrypts the communication between your browser and the website, protecting your data from eavesdropping.

4. Manage Your Social Media Presence

Social media platforms collect vast amounts of personal data, and this data can be used for targeted advertising, profiling, and even identity theft. Manage your social media presence carefully:

  • Review Your Privacy Settings: Regularly review and adjust your privacy settings on each social media platform. Limit the amount of personal information you share publicly, and be cautious about the information you share with friends and followers.

  • Be Mindful of What You Share: Think twice before posting anything online that could compromise your privacy or security. Avoid sharing sensitive information like your address, phone number, or financial details.

  • Limit the Apps You Connect to Your Social Media Accounts: Only connect apps to your social media accounts that you trust and understand their data collection practices.

  • Regularly Review Your Connected Accounts: Periodically review the apps and websites that are connected to your social media accounts and remove any that you no longer use or trust.

5. Protect Your Devices

Your devices – computers, smartphones, and tablets – are vulnerable to malware, viruses, and other threats that can compromise your privacy. Take these steps to protect your devices:

  • Install and Maintain Anti-Virus Software: Install reputable anti-virus software on all your devices and keep it updated. Regularly scan your devices for malware and viruses.

  • Keep Your Software Updated: Keep your operating system, apps, and browsers updated with the latest security patches. Outdated software is often vulnerable to exploits.

  • Use Strong Device Passwords or Biometrics: Protect your devices with strong passwords or biometric authentication (fingerprint, facial recognition).

  • Be Cautious About Downloads and Attachments: Only download files and open attachments from trusted sources. Avoid clicking on suspicious links or downloading files from unknown websites.

  • Enable Device Encryption: Enable device encryption to protect your data if your device is lost or stolen.

6. Be Mindful of Online Tracking

Websites and online services use various tracking technologies to collect data about your online activities. This data can be used for targeted advertising, profiling, and other purposes. Here’s how to mitigate online tracking:

  • Use Privacy-Focused Browsers and Extensions: As mentioned earlier, privacy-focused browsers and extensions can help block trackers and reduce online tracking.

  • Enable Do Not Track (DNT): While DNT is not universally respected, enabling it in your browser settings signals to websites that you do not want to be tracked.

  • Use a Privacy-Focused Search Engine: Consider using a privacy-focused search engine like DuckDuckGo, which does not track your searches.

  • Review Website Privacy Policies: Before using a website or online service, review its privacy policy to understand how it collects and uses your data.

7. Regularly Review and Update Your Privacy Settings

Privacy settings change frequently, and it’s crucial to regularly review and update your settings across all your online accounts and devices. This ensures that your privacy protections are always up-to-date and effective. Make this a regular part of your digital hygiene routine.

By diligently implementing these seven powerful steps, you can significantly enhance your online privacy and create a more secure digital environment. Remember that online privacy is an ongoing process, requiring constant vigilance and adaptation to evolving threats. Stay informed about the latest security best practices and make protecting your privacy a top priority. Your digital fortress awaits its construction – begin building it today!

Closure

Thus, we hope this article has provided valuable insights into Ultimate Guide: 7 Powerful Steps to Secure Your Digital Fortress. We thank you for taking the time to read this article. See you in our next article!
google.com

Popular Posts

My Favorites

Essential 5 Coding Software For Aspiring Developers: A Powerful Guide

0
Essential 5 Coding Software for Aspiring Developers: A Powerful Guide Related Articles: Essential 5 Coding Software for Aspiring Developers: A Powerful Guide Essential Project Management Software:...